


Table of contents
- How would we build this?
- What’s the purpose?
- Pre-requisites
- Setting up the React project
- Creating the S3 bucket for hosting the static website
- Setting up Amazon CloudFront distribution
- Deploying the CloudFormation Stack
- Building and uploading the React app
- Closing the curtains…
- Additional Resources for Further Learning
Throughout my years as a software developer specializing in frontend technologies, I've admired the simplicity of deploying static HTML, CSS, and JavaScript files to cloud hosting providers like Netlify, Vercel, or GitHub Pages. These platforms serve as Content Delivery Networks (CDNs) and automatically generate live URLs for hosted websites. Previously, I would use shared hosting or rent a Virtual Private Server (VPS) from providers like GoDaddy. Then, I would upload static files to the hosting server using an FTP client like Filezilla. Additionally, I needed to register a domain, or my website URL would default to the hosting server's IP address.
Some organizations utilize cloud services like Amazon S3 or Azure Blob storage to store and serve files. However, this approach requires additional configuration, such as proper access permissions, MIME types, and cache headers.
In a previous article on AWS CloudFormation, I suggested creating a static website hosted on Amazon S3 and distributed using Amazon CloudFront, using CloudFormation to provision and configure the S3 bucket and CloudFront distribution as a practice exercise.
Building on that idea, I've developed this tutorial to guide you through hosting and deploying a React static website on AWS using services like S3, CloudFront, and CloudFormation. If you're unfamiliar with Amazon CloudFront, it's a content delivery network (CDN) service designed to enhance web applications' performance, availability, and security by distributing content to users from geographically closer edge locations.
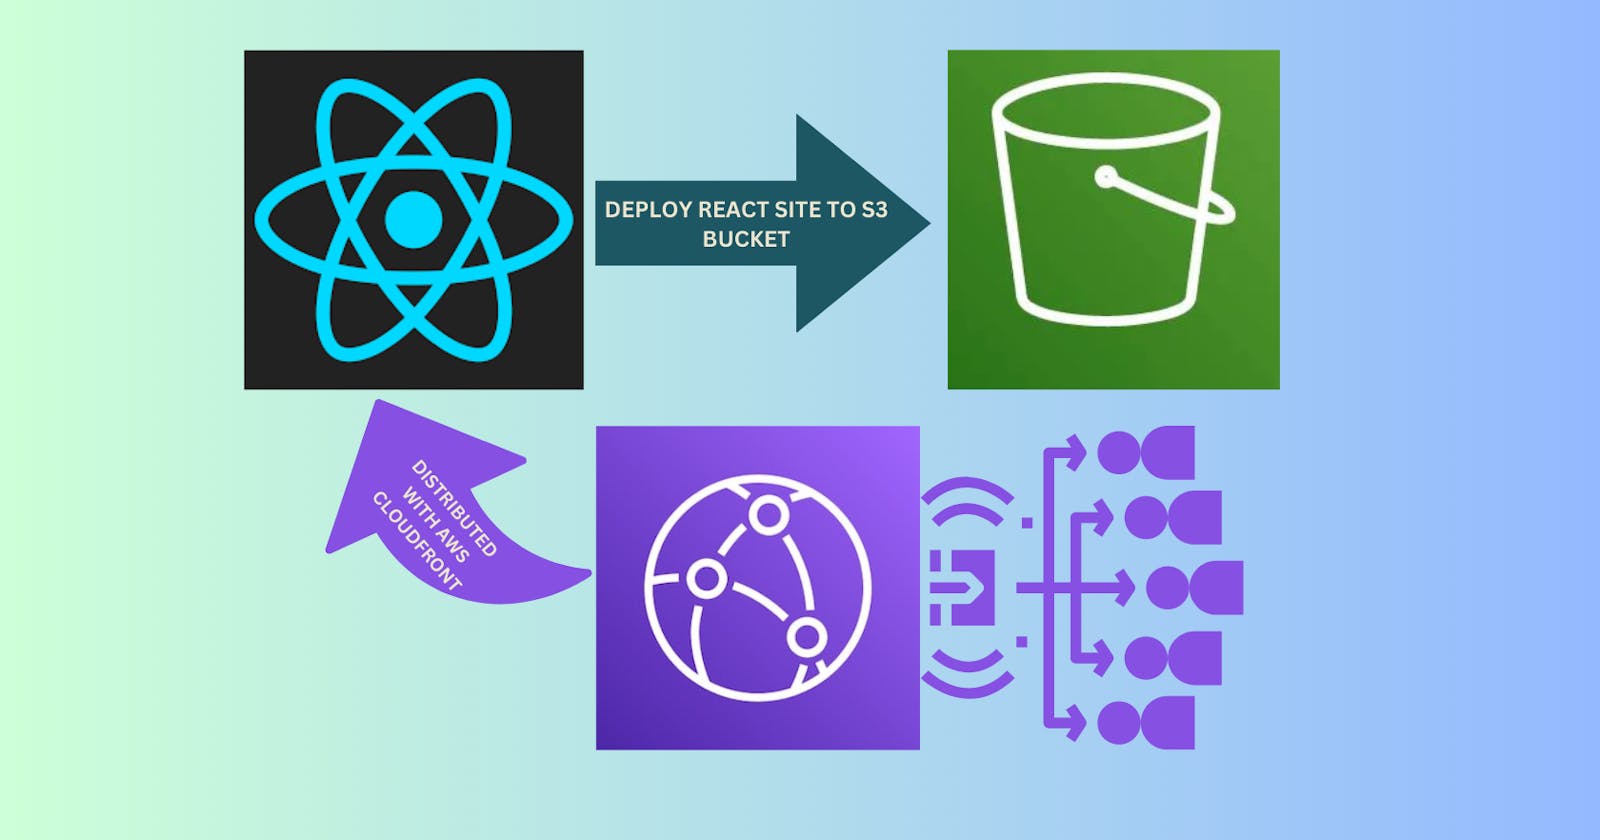
How would we build this?
This tutorial will use Amazon S3, Amazon CloudFront, and AWS CloudFormation to deploy a React-based static website.
S3 will be used to store the compiled static website files generated from the React project.
To enhance the performance and global reach of the website, we will use CloudFront CDN service to cache and serve content to users from edge locations closer to them.
AWS CloudFormation will be the backbone of this setup, as it allows us to define the infrastructure for our static website as code. Creating a CloudFormation template will automate the provisioning and configuration of the S3 bucket and CloudFront distribution.
What’s the purpose?
Using this combination of services, we are taking advantage of the scalability, security, and reliability offered by the AWS ecosystem. With the static website hosted on S3 and distributed through CloudFront, users will experience faster load times and better performance. At the same time, managing the infrastructure with CloudFormation ensures that the entire setup can be version-controlled, easily updated, and maintained systematically.
In other words, we are building a mini Vercel or Netlify for deploying static React apps.
Pre-requisites
It would be best if you had the following:
AWS Account: Sign up for an AWS account if you don't have one already.
AWS CLI: Install and configure the AWS CLI on your local machine. For instructions, follow this guide: docs.aws.amazon.com/cli/latest/userguide/in..
Code editor (preferably VS Code)
Basic Knowledge of AWS CloudFormation
Enable AmazonS3FullAccess and AWSCloudFormationFullAccess Permission for your IAM user.
Nodejs ≥v16 installed
Let’s get started.
Setting up the React project
I found a beautiful todo app by Ilyas Belaoud on GitHub, and we will use it for this project. To get started, clone the repository:
git clone https://github.com/ilyasbelaoud/react-todo-app.git
Install the dependencies by running this command:
npm install
When it’s done installing, run the app with this command:
npm run start
The app will start at [http://localhost:3000](http://localhost:3000) on your browser. You should see something like this:
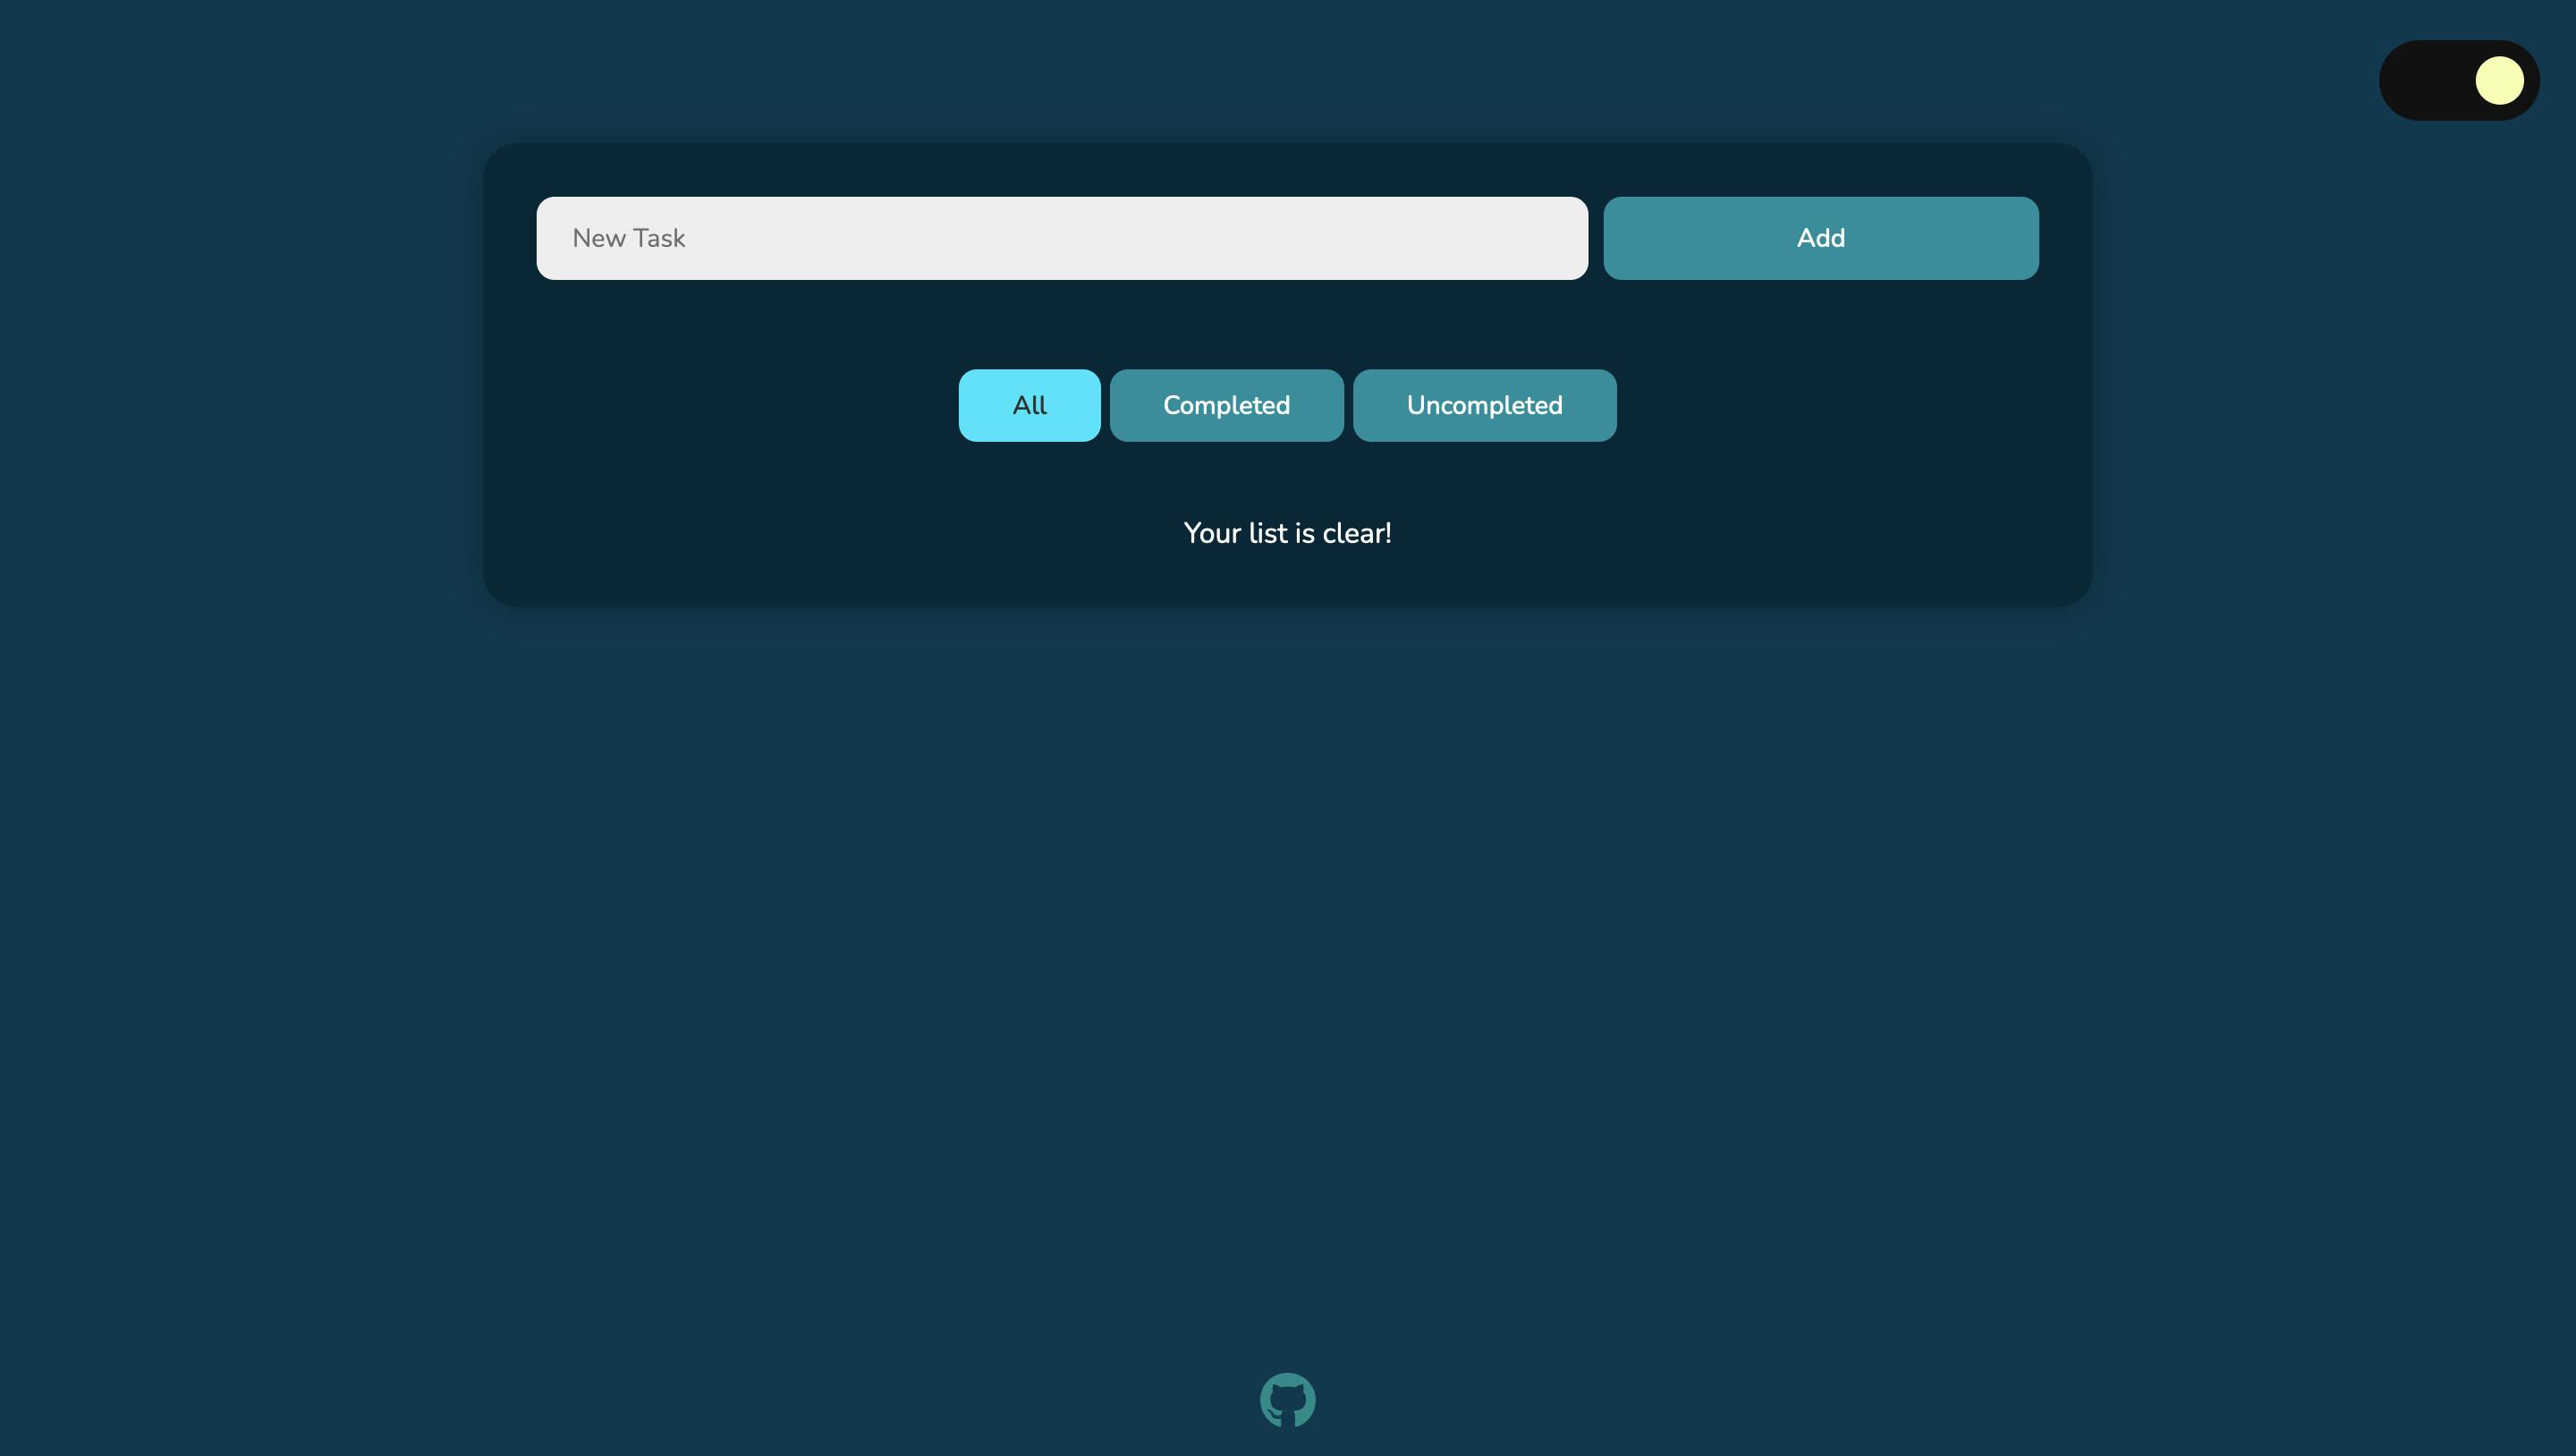
Great! We’ve set up the React app.
Creating the S3 bucket for hosting the static website
Let’s go ahead and create the S3 bucket to host the React app.
Write the CloudFormation template to create an S3 bucket
To create an S3 bucket using CloudFormation, you must define the bucket resource in a YAML or JSON template file. In this example, I'll use YAML.
Create a file called s3-react-static-website.yaml and add these lines of code:
Resources:
  StaticWebsiteBucket:
    Type: 'AWS::S3::Bucket'
    Properties:
      BucketName: <random-unique-string>
This template defines a single S3 bucket resource named "StaticWebsiteBucket" with the specified bucket name. Replace my-static-website-bucket with a unique bucket name of your choice.
Configure the bucket to act as a static website host
To configure the S3 bucket for hosting a static website, add the WebsiteConfiguration property to the bucket definition in the CloudFormation template.
Resources:
  StaticWebsiteBucket:
    Type: 'AWS::S3::Bucket'
    Properties:
      BucketName: <random-unique-string>
      PublicAccessBlockConfiguration:
        BlockPublicAcls: false
        BlockPublicPolicy: false
        IgnorePublicAcls: false
        RestrictPublicBuckets: false
      WebsiteConfiguration:
        IndexDocument: index.html
        ErrorDocument: 404.html
Here, we've specified index.html as the index document and 404.html as the error document. Adjust the file names according to your project structure.
The PublicAccessBlockConfiguration property is important because all Block Public Access settings are automatically enabled when a new bucket is created. So for the purpose of this demo, we are setting them to false.
Set up appropriate bucket policies for public access
To grant public read access to the objects in your S3 bucket, you need to create an S3 bucket policy. Add the following resource to your CloudFormation template:
Resources:
  # ... (previous resources) ...

  StaticWebsiteBucketPolicy:
    Type: 'AWS::S3::BucketPolicy'
    Properties:
      Bucket: !Ref StaticWebsiteBucket
      PolicyDocument:
        Version: '2012-10-17'
        Statement:
          - Effect: Allow
            Principal: '*'
            Action:
              - 's3:GetObject'
            Resource: !Sub 'arn:aws:s3:::${StaticWebsiteBucket}/*'
This policy allows public GetObject access to all objects in the bucket. The !Ref function is used to reference the bucket created earlier, and the !Sub function is used to substitute the bucket name into the resource ARN.
This is the complete Yaml code:
AWSTemplateFormatVersion: '2010-09-09'
Description: 'Create an S3 bucket for hosting a static React website'

Resources:
  StaticWebsiteBucket:
    Type: 'AWS::S3::Bucket'
    Properties:
      BucketName: my-static-website-bucket
      PublicAccessBlockConfiguration:
        BlockPublicAcls: false
        BlockPublicPolicy: false
        IgnorePublicAcls: false
        RestrictPublicBuckets: false
            WebsiteConfiguration:
        IndexDocument: index.html
        ErrorDocument: 404.html

  StaticWebsiteBucketPolicy:
    Type: 'AWS::S3::BucketPolicy'
    Properties:
      Bucket: !Ref StaticWebsiteBucket
      PolicyDocument:
        Version: '2012-10-17'
        Statement:
          - Effect: Allow
            Principal: '*'
            Action:
              - 's3:GetObject'
            Resource: !Sub 'arn:aws:s3:::${StaticWebsiteBucket}/*'
Setting up Amazon CloudFront distribution
In this section, we will set up the CloudFront distribution. These are the steps we will take:
Write the CloudFormation template to create an S3 bucket
Configure the distribution to use the S3 bucket as the origin
Set up caching, SSL, and other settings as needed
Let’s get started.
Write the CloudFormation template to create a CloudFront distribution
To create a CloudFront distribution using CloudFormation, you must define the distribution resource in the YAML template file. Update the existing YAML file that you used to set up the S3 bucket:
Resources:
  # ... (previous resources) ...

  StaticWebsiteCloudFrontDistribution:
    Type: 'AWS::CloudFront::Distribution'
    Properties:
      DistributionConfig:
        Enabled: true
        DefaultRootObject: index.html
        Origins:
          - DomainName: !GetAtt StaticWebsiteBucket.RegionalDomainName
            Id: StaticWebsiteS3Origin
            S3OriginConfig:
              OriginAccessIdentity: ''
This template defines a single CloudFront distribution resource named StaticWebsiteCloudFrontDistribution. The distribution is enabled and configured to use the S3 bucket as its origin.
Let me break down the relevant parts of this code snippet.
The
Propertiessection is where you define the properties of the CloudFront distribution. TheDistributionConfigproperty contains the configuration settings for the CloudFront distribution.The
Enabledproperty is set to "true", which means that the CloudFront distribution is active.The
DefaultRootObjectproperty is set toindex.html. This means that when a user accesses the root of your CloudFront distribution, CloudFront will return theindex.htmlfile.The
Originsproperty lists origins for the CloudFront distribution. In this case, there's only one origin: the S3 bucket you created earlier for hosting the static website.DomainName: The domain name of the S3 bucket.!GetAtt StaticWebsiteBucket.RegionalDomainNameis a CloudFormation function that retrieves the regional domain name of the S3 bucket you created earlier.Id: A unique identifier for the origin, in this case, "StaticWebsiteS3Origin".S3OriginConfig: Configuration settings specific to the S3 origin.OriginAccessIdentityis set to an empty string, meaning the CloudFront distribution will use the S3 bucket's public access settings.
Configure the distribution to use the S3 bucket as the origin
In the YAML file, we've already configured the CloudFront distribution to use the S3 bucket created earlier as its origin. The !GetAtt function is used to get the regional domain name of the S3 bucket.
Set up caching, SSL, and other settings as needed
For caching and other settings, you can configure the CacheBehaviors and DefaultCacheBehavior properties of the distribution. You can add an ACM (AWS Certificate Manager) certificate ARN to the ViewerCertificate property to enable SSL. However, seeing as we don’t have a custom domain, we will not include the ViewerCertificate.
Does this mean the website connection will be unsafe using HTTP? No, it doesn’t. The CloudFront distribution will use the default CloudFront domain (e.g., d12345abcd12345.cloudfront.net). The connection will still be secure using HTTPS with the default CloudFront certificate, but the URL will not use a custom domain.
Update your Yaml file with these lines of code:
Resources:
  # ... (previous resources) ...

  StaticWebsiteCloudFrontDistribution:
    Type: 'AWS::CloudFront::Distribution'
    Properties:
      DistributionConfig:
        Enabled: true
        DefaultRootObject: index.html
        Origins:
          - DomainName: !GetAtt StaticWebsiteBucket.RegionalDomainName
            Id: StaticWebsiteS3Origin
            S3OriginConfig:
              OriginAccessIdentity: ''
        DefaultCacheBehavior:
          AllowedMethods:
            - GET
            - HEAD
          CachedMethods:
            - GET
            - HEAD
          Compress: true
          ForwardedValues:
            QueryString: false
            Cookies:
              Forward: none
          MinTTL: 3600
          MaxTTL: 86400
          DefaultTTL: 86400
          TargetOriginId: StaticWebsiteS3Origin
          ViewerProtocolPolicy: redirect-to-https
This configuration sets up caching, enables Gzip compression, and enforces HTTPS. Let’s break down some of the relevant parts of this code snippet. You can notice some properties you’ve used previously repeated, right? I think this is how you get to learn faster.
The
DefaultCacheBehaviorproperty is used to configure how CloudFront processes requests and caches content. In this case, theAllowedMethodsproperty specifies which HTTP methods are allowed for requests. We only allow "GET" and "HEAD" methods since it's a static website; these are the only methods needed to fetch content.The
CachedMethodsproperty lists the HTTP methods for which CloudFront caches the responses. We cacheGETand "HEAD" responses to serve content faster to users from edge locations.The
Compressproperty is set totrue, which enables automatic Gzip compression of files. This reduces the transmitted files' size, resulting in faster load times and reduced data transfer costs.The
ForwardedValuesproperty specifies how CloudFront forwards query strings and cookies to the origin (the S3 bucket in this case). In this configuration, we setQueryStringtofalse, meaning CloudFront does not forward query strings to the origin. We set Forward to none for theCookiesproperty, indicating that CloudFront does not forward any cookies to the origin.These properties set the Time-to-Live (TTL) values for cached objects in seconds:
MinTTLis the minimum amount of time that objects stay in the cache,MaxTTLis the maximum time, andDefaultTTLis the default time if no other value is specified in the cache-control header from the origin. In this configuration, the minimum TTL is set to 1 hour (3600 seconds), the maximum TTL is set to 24 hours (86400 seconds), and the default TTL is also set to 24 hours (86400 seconds).The
TargetOriginIdproperty specifies the origin (in this case, the S3 bucket) to which CloudFront forwards requests. The value "StaticWebsiteS3Origin" matches the "Id" value specified in the "Origins" property earlier.The
ViewerProtocolPolicyproperty sets how CloudFront handles HTTP and HTTPS requests from users. In this case, "redirect-to-https" means that CloudFront automatically redirects HTTP requests to HTTPS, ensuring users access the site securely.
So far, this is how our Yaml file looks like:
AWSTemplateFormatVersion: '2010-09-09'
Description: 'AWS CloudFormation Template: Static Website with React, Amazon S3, and Amazon CloudFront'
Resources:
  StaticWebsiteBucket:
    Type: 'AWS::S3::Bucket'
    Properties:
      BucketName: your-unique-bucket-name
      PublicAccessBlockConfiguration:
        BlockPublicAcls: false
        BlockPublicPolicy: false
        IgnorePublicAcls: false
        RestrictPublicBuckets: false
      WebsiteConfiguration:
        IndexDocument: index.html
        ErrorDocument: error.html

  StaticWebsiteBucketPolicy:
    Type: 'AWS::S3::BucketPolicy'
    Properties:
      Bucket: !Ref StaticWebsiteBucket
      PolicyDocument:
        Id: PublicReadForWebsiteContent
        Version: '2012-10-17'
        Statement:
          - Sid: PublicRead
            Effect: Allow
            Principal: '*'
            Action: 's3:GetObject'
            Resource: !Sub 'arn:aws:s3:::${StaticWebsiteBucket}/*'

  StaticWebsiteCloudFrontDistribution:
    Type: 'AWS::CloudFront::Distribution'
    Properties:
      DistributionConfig:
        Enabled: true
        DefaultRootObject: index.html
        Origins:
          - DomainName: !GetAtt StaticWebsiteBucket.RegionalDomainName
            Id: StaticWebsiteS3Origin
            S3OriginConfig:
              OriginAccessIdentity: ''
        DefaultCacheBehavior:
          AllowedMethods:
            - GET
            - HEAD
          CachedMethods:
            - GET
            - HEAD
          Compress: true
          ForwardedValues:
            QueryString: false
            Cookies:
              Forward: none
          MinTTL: 3600
          MaxTTL: 86400
          DefaultTTL: 86400
          TargetOriginId: StaticWebsiteS3Origin
          ViewerProtocolPolicy: redirect-to-https
Deploying the CloudFormation Stack
This section will deploy the cloud formation stack using the AWS CLI.
Follow these steps:
Run the following AWS CLI command to create the CloudFormation stack:
aws cloudformation create-stack --stack-name <YourPreferredStackName> --template-body file://s3-react-static-website.yamlIt might take some minutes to deploy, depending on your internet connection.
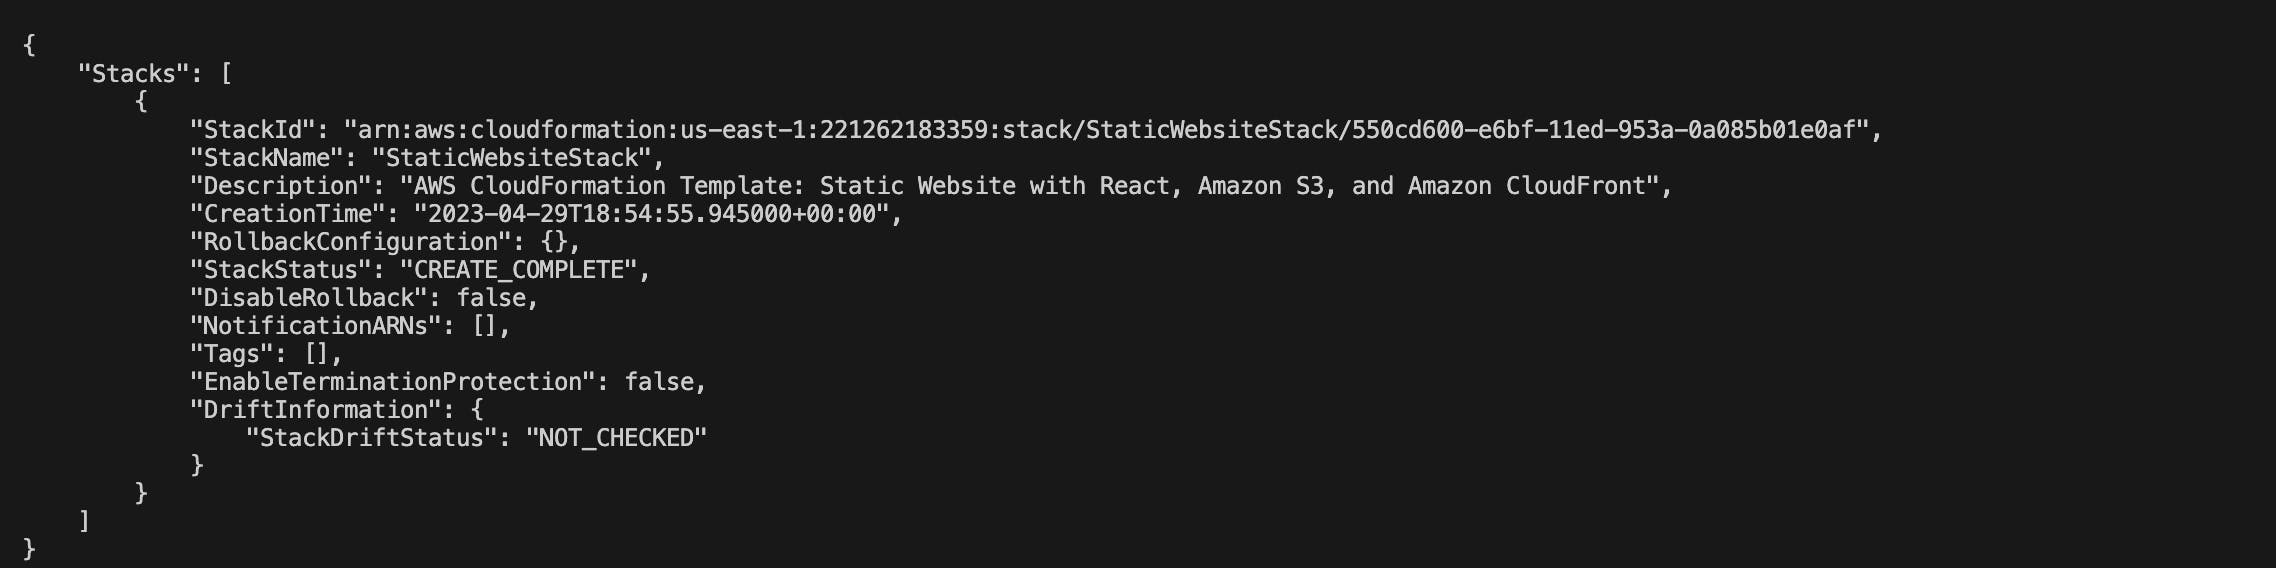
To verify the stack creation progress, run the following command:
aws cloudformation describe-stacks --stack-name <YourStackName>If it’s deployed successfully, you should see this on your terminal:
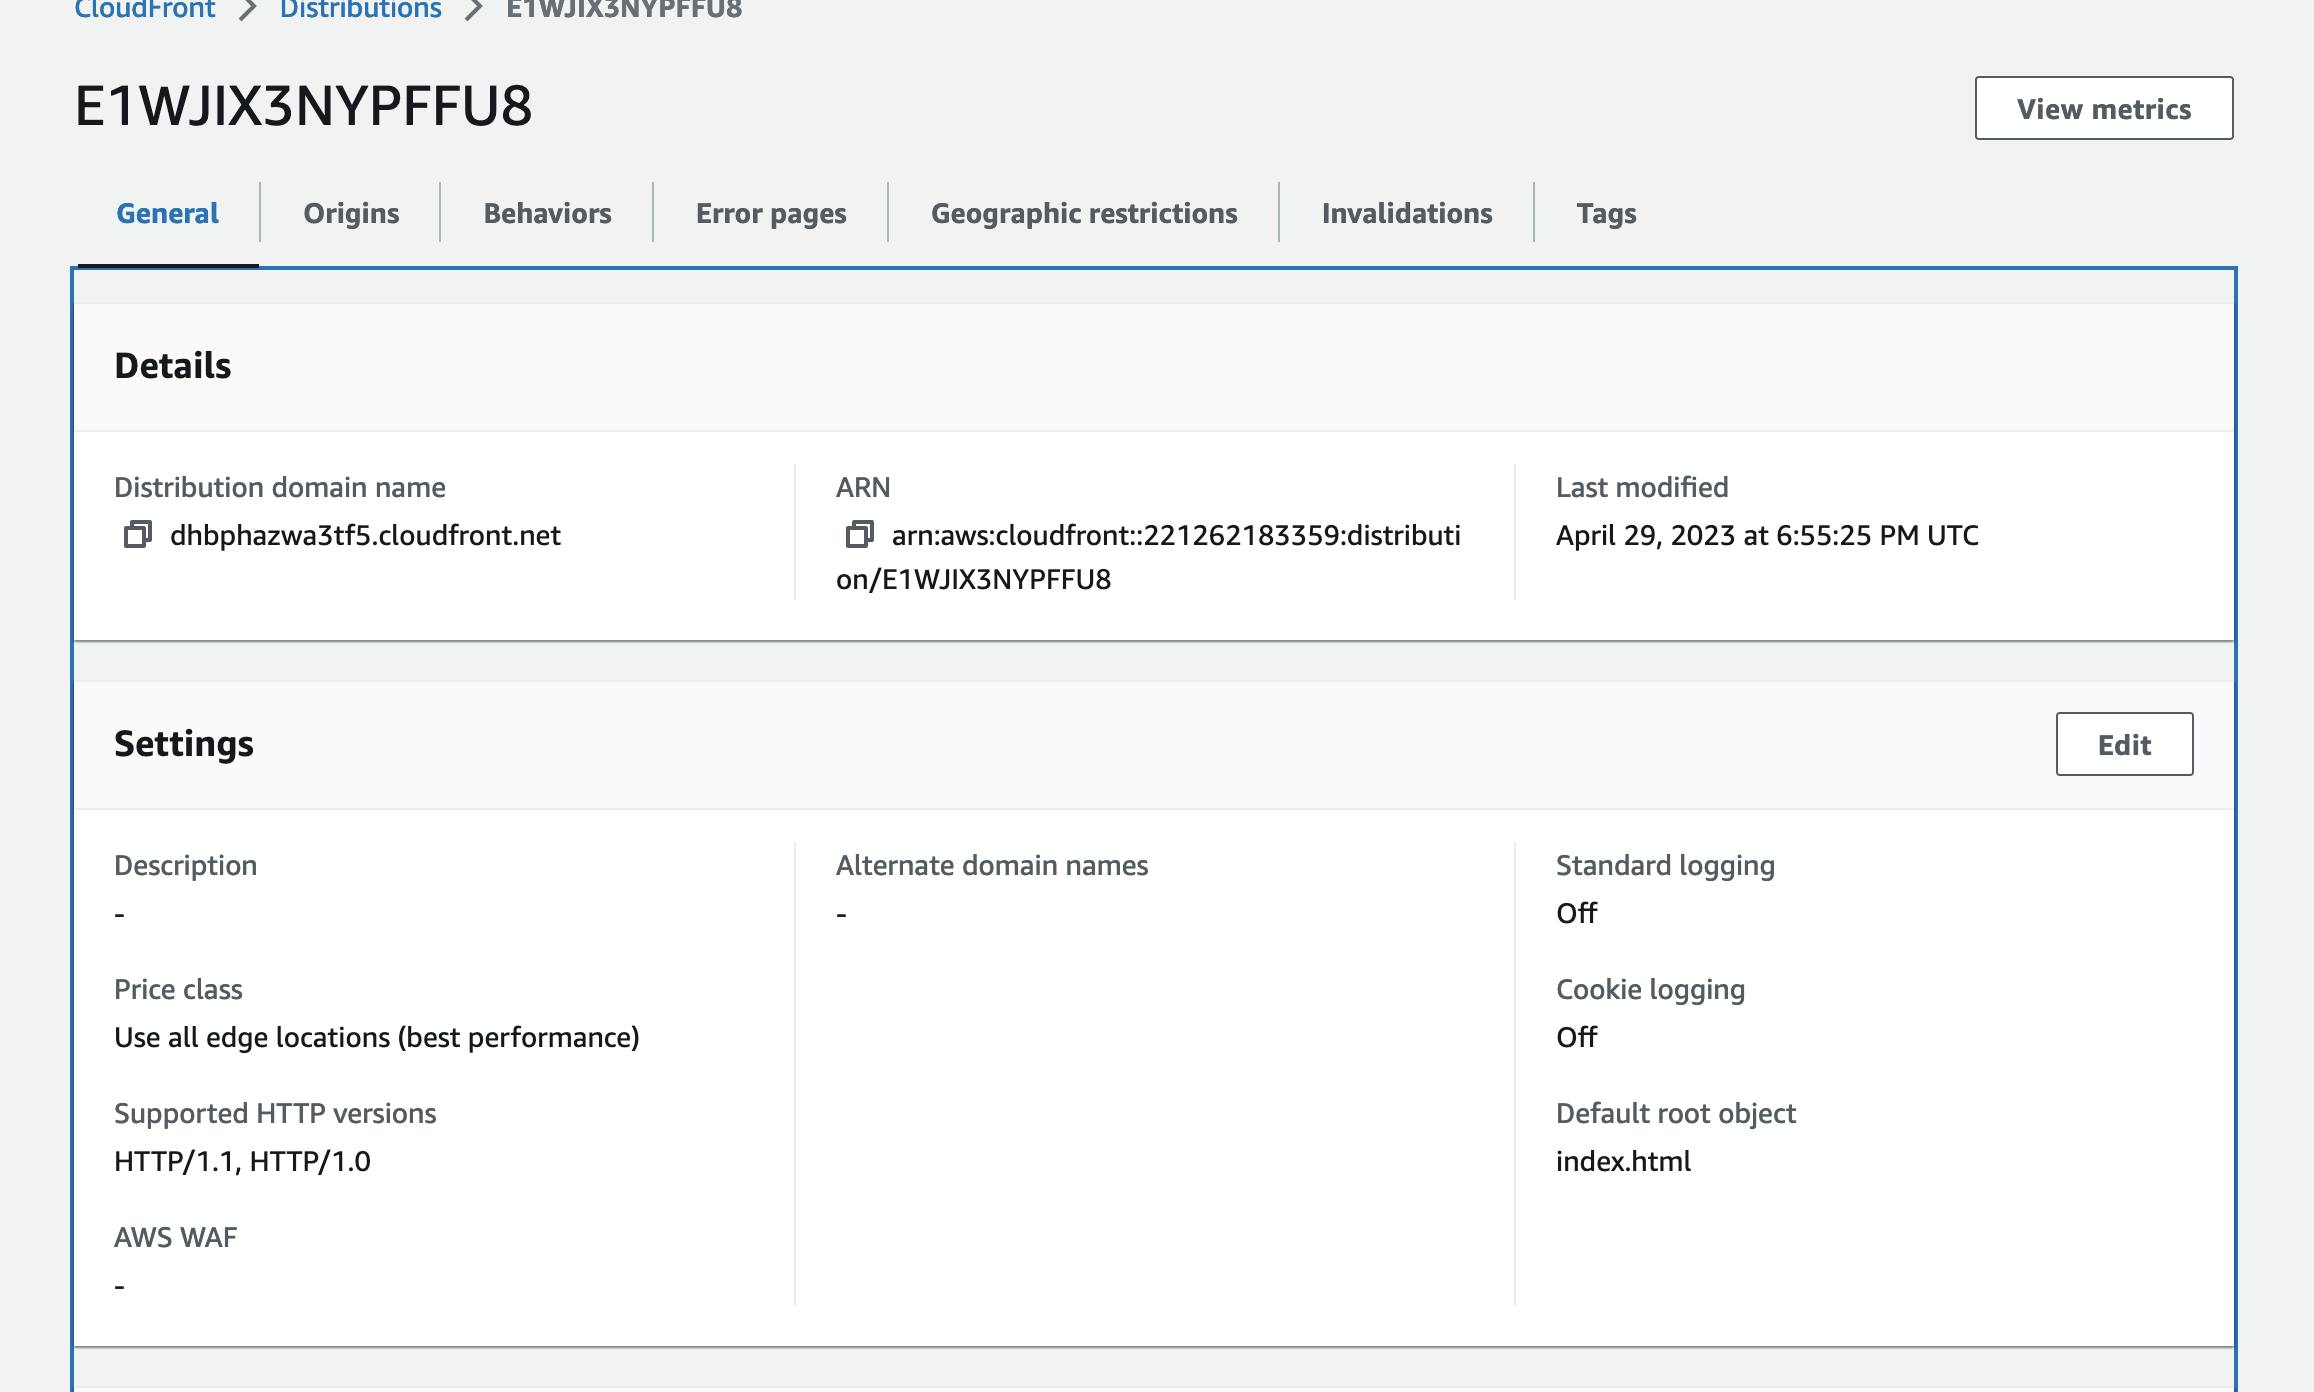
You can also verify from your cloud formation console:

Awesome!
Building and uploading the React app
Now that your CloudFormation stack has been successfully deployed and the S3 bucket and CloudFront distribution are set up, it's time to build and upload your React app.
Build the React app
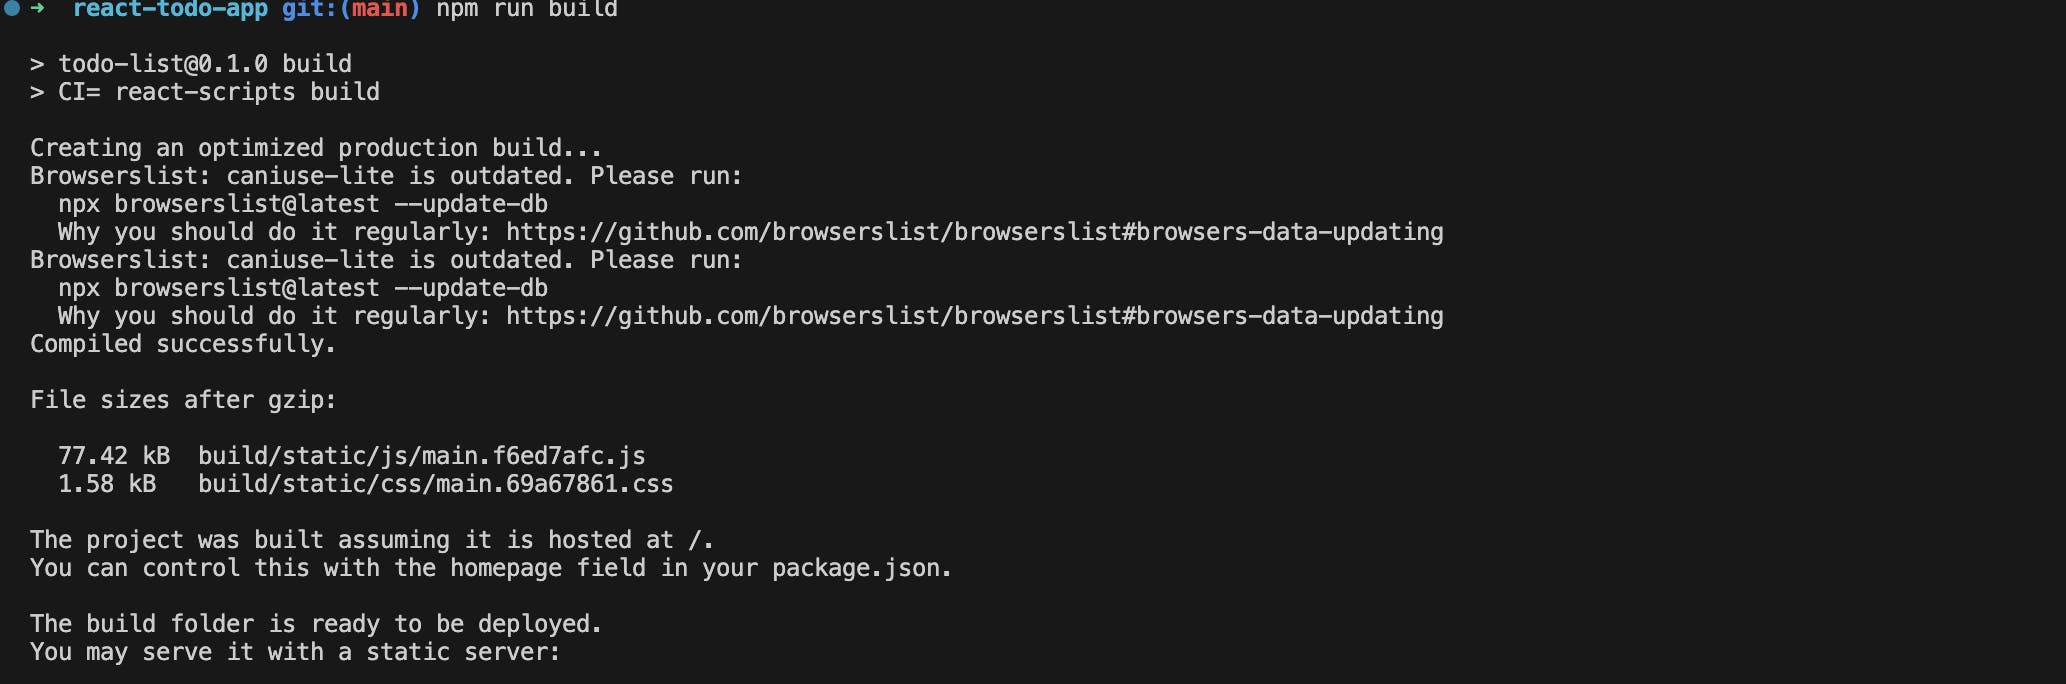
Navigate to your React app's root directory in your terminal and run the following command to create a production-ready build of your React app:
npm run build
This command generates a build folder in your project directory containing the minified and optimized files necessary for deploying your React app.
Upload the contents of the build folder to the S3 bucket
Let’s now use the AWS CLI to upload the build folder contents to the s3 bucket.
Navigate to the build folder in your React app's directory. Run the following command to sync the contents of the build folder to your S3 bucket:
aws s3 sync . s3://your-bucket-name
You can find your bucket name in your s3 dashboard. You should get something like this:

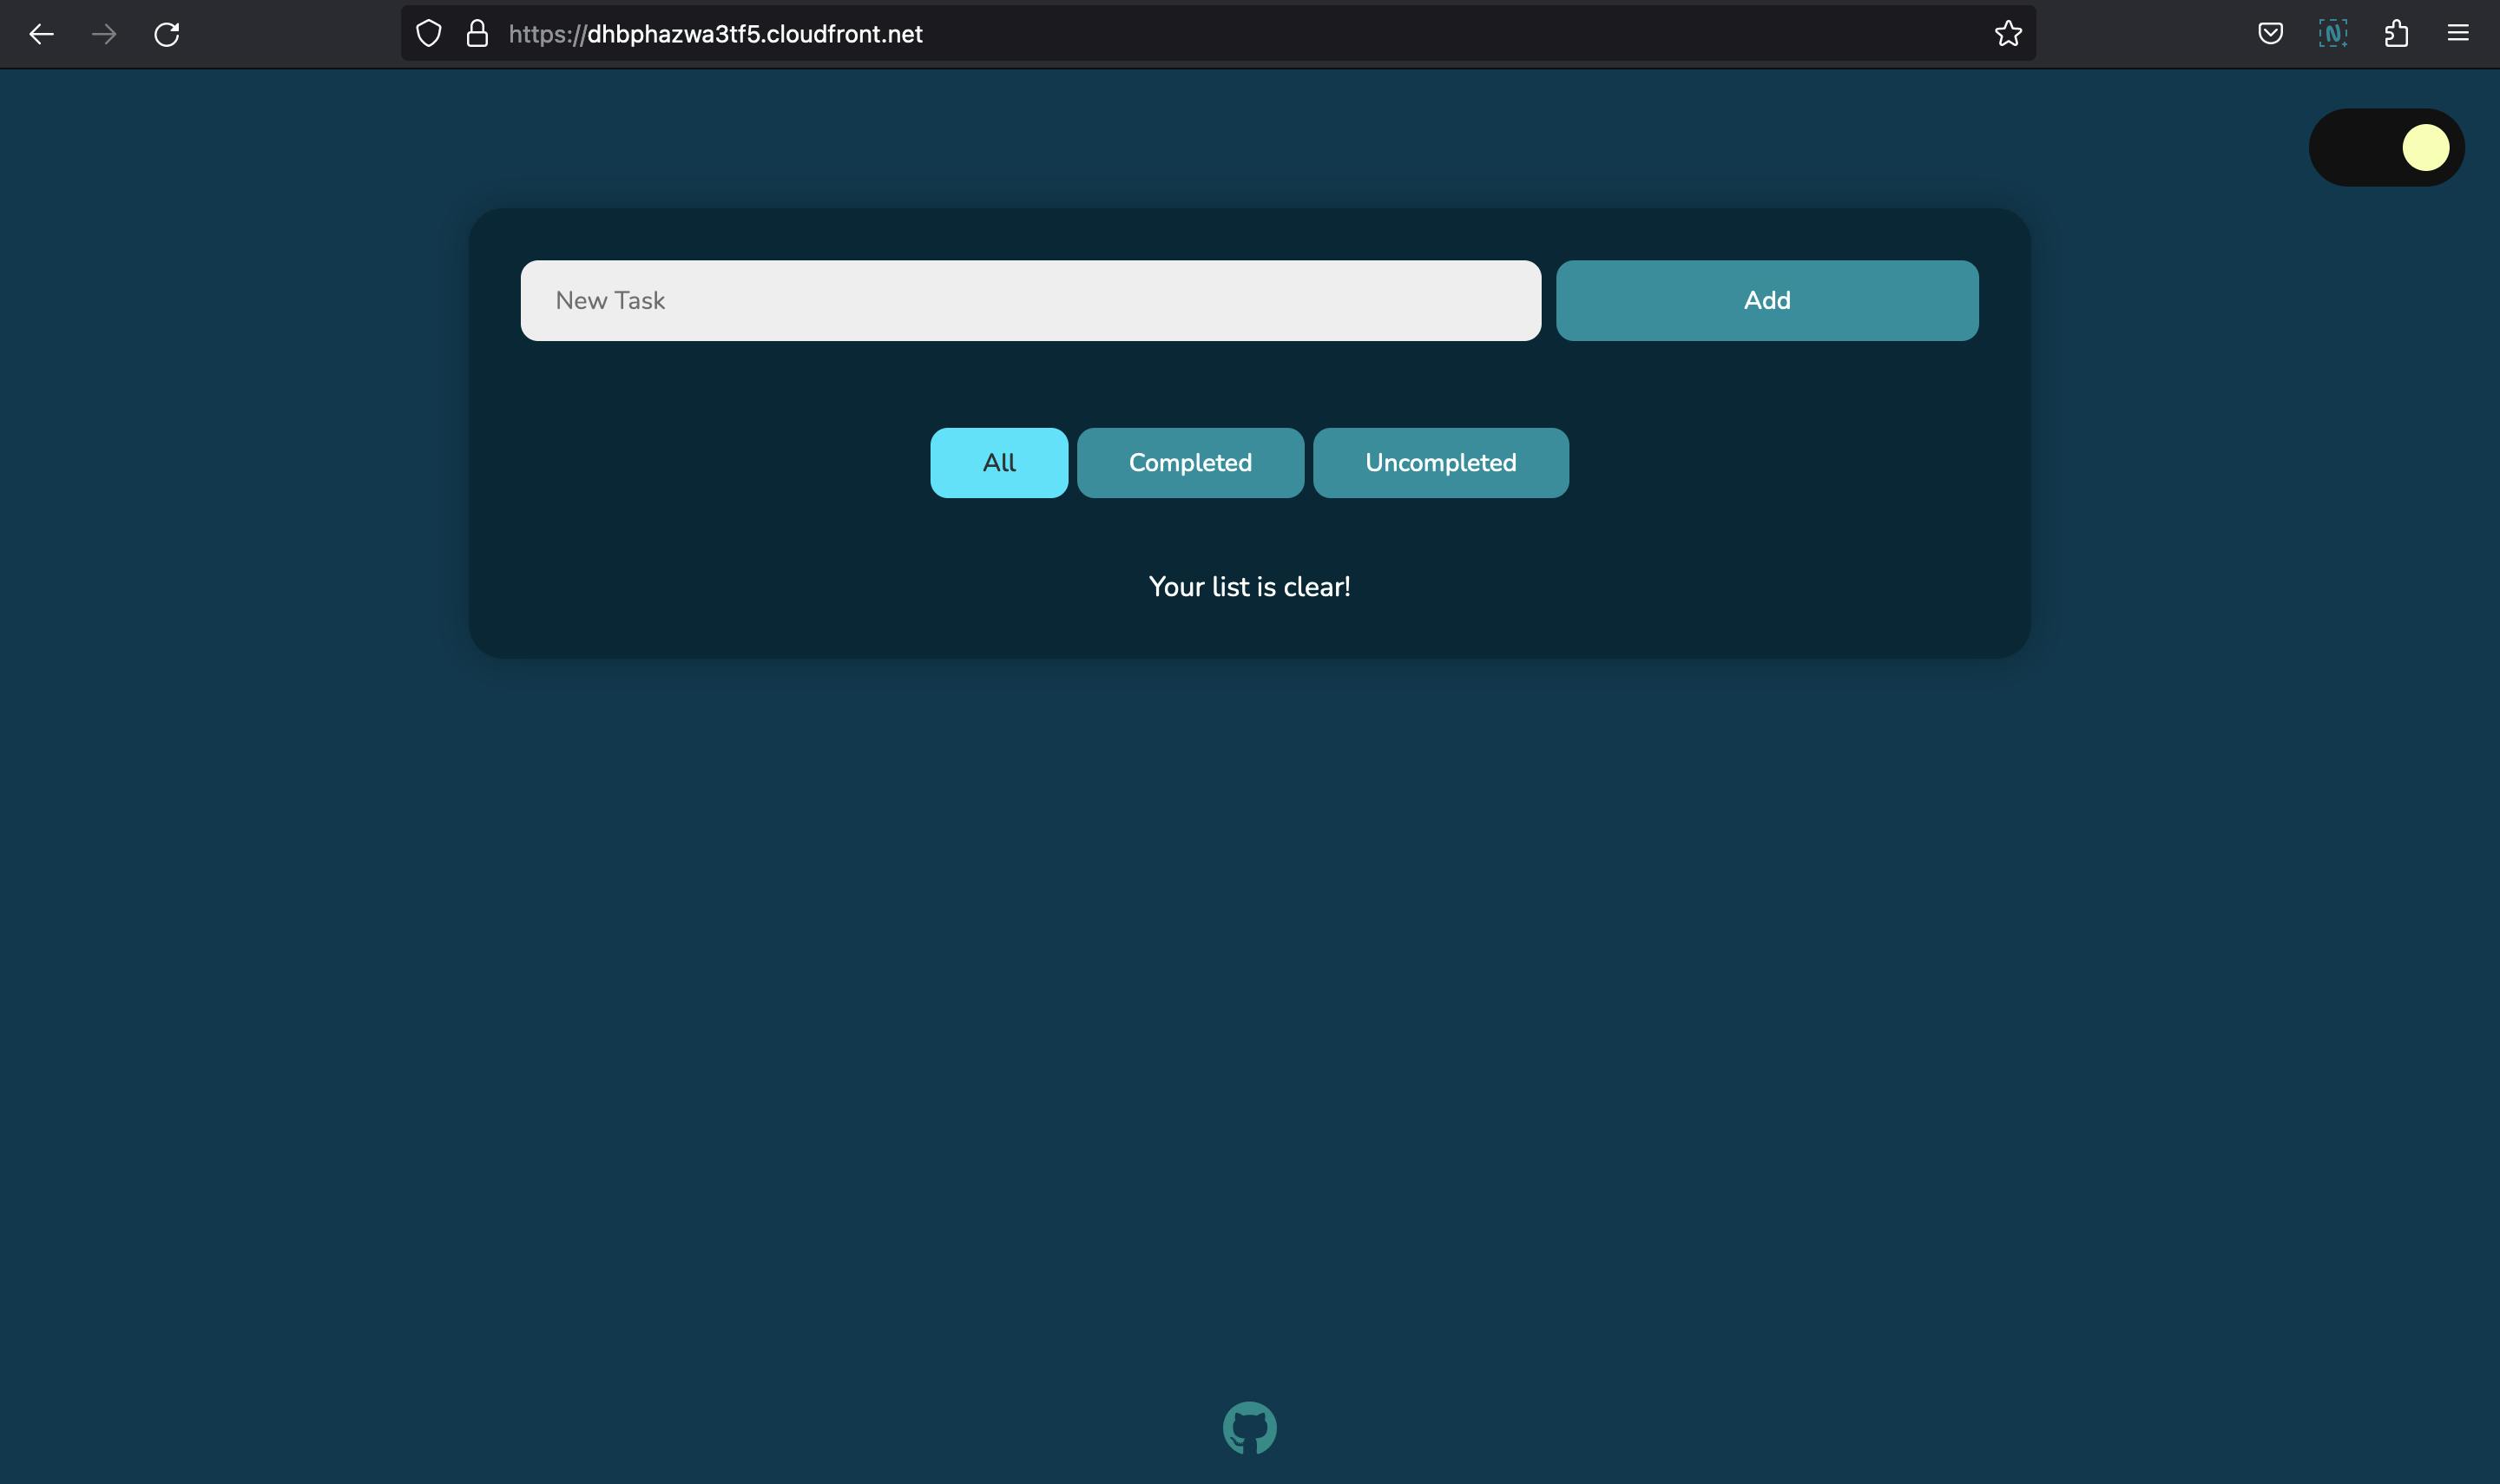
After uploading the contents of the build folder to the S3 bucket, your React static website should be accessible through the CloudFront distribution URL. You can find the URL in the Amazon CloudFront console under the "Domain Name" column for your distribution.
And yes, it works!
Closing the curtains…
In this tutorial, we've gone through the step-by-step process of hosting and deploying a React static website on AWS using S3, CloudFront, and CloudFormation. We've learned to create and configure an S3 bucket for hosting our website files, set up a CloudFront distribution to optimize performance, and used CloudFormation to automate the provisioning and management of these resources.
By leveraging these AWS services, we've successfully deployed a scalable, high-performance, and globally accessible React static website. We've also familiarized ourselves with the AWS ecosystem, gaining valuable skills and knowledge that can be applied to future projects.
This tutorial serves as a solid foundation for more advanced use cases, enabling you to harness the full potential of AWS CloudFormation Infrastructure as Code Service.