

Boost Your App's Performance and Avoid Costly Errors with Sequelize Mocking Made Easy
Unleash the Power of Node.js and Sequelize Integration


Table of contents
- Pre-requisites
- Setting up the development environment
- Setting up the Database Connection
- Creating the Sequelize models
- CRUD Operations using Sequelize Query Methods
- Implementing the Sequelize mock library
- Writing test cases for Sequelize models
- Integrating Sequelize mock into test cases
- Best practices for mocking Sequelize databases
- Wrapping up
- Additional Resources
- Further Reading
Sequelize is a powerful Object-Relational Mapping (ORM) library for Node.js that allows developers to interact with databases using JavaScript. It provides a simple and elegant way to define and manipulate data models that map to relational database tables. However, testing Sequelize applications can be challenging as it requires a live database connection to function properly, which can be slow and unreliable in a testing environment.
To overcome this issue, I often use a technique called "mocking". It involves creating a fake version of the Sequelize database that I can use for testing purposes. This technique allows me to create and test my applications without the need for a live database connection. It saves me a lot of time and effort, as I can catch bugs and errors early on in the development process. Additionally, it gives me more control over the testing environment, making it easier to reproduce specific scenarios and ensure the reliability of my code.
Mocking databases in development and testing is crucial for several reasons, including:
- Isolation of components: Mocking databases allows developers to isolate the component or feature being tested from the actual database. This isolation helps in identifying potential issues in the application code without being affected by the state or behavior of the actual database.
- Faster testing: Real databases can introduce latency due to factors like network connections which can slow down testing. Mocking databases provides faster test execution as it eliminates these factors, leading to more efficient development and debugging processes.
- Consistent test data: Using mock databases makes sure that test data remains consistent across multiple runs, enabling the developer to reproduce errors and issues more reliably. This consistency is particularly important when working in a team, as it reduces the likelihood of avoidable issues between individual test environments.
- Parallel testing: Mocking databases allows multiple tests to be run in parallel without interfering with each other's data, which can significantly reduce testing time.
- Error simulation: Mocking databases makes it easier to simulate different types of errors and edge cases that might not be straightforward to reproduce with a real database. This simulation helps the developer to build more robust applications and handle potential errors better.
- Database-agnostic testing: By mocking the database, developers can write tests that are independent of the specific database system being used. This approach can be beneficial when planning to switch database systems in the future or supporting multiple databases for different deployment scenarios.
Generally, mocking databases in software development and testing is essential for ensuring the reliability, efficiency, and maintainability of the application, as well as reducing costs and facilitating easier collaboration between developers.
In this tutorial, I'm excited to guide you through building a nodejs API using Sequelize 6 (stable) as the database ORM. Together, we'll create models and associations with Sequelize, and create a mock database connection with sequelize-mock to test our API. I'll be walking you through some test cases for the sequelize models. Additionally, I'll be sharing with you some of the best practices for mocking Sequelize databases that I've learned through my own experience. By the end of this tutorial, you'll be well-equipped with the knowledge and skills to build reliable, efficient, and thoroughly tested APIs using Sequelize.
Pre-requisites
To follow through with this tutorial, you should have the following:
- Nodejs ≥ v16
- Code editor (VS Code preferably)
- Knowledge of JavaScript and databases
Setting up the development environment
Follow these steps to setup the development server for this project.
First, create a new project directory by running this command:
mkdir node-sequelize-project
cd node-sequelize-project
Next, initialize a Node project:
npm init -y
This command will create a package.json file in your project directory.
Next, install the required dependencies:
npm install --save express sequelize sequelize-cli sqlite3 nodemon
Here, we're installing Express (a web framework for Node.js), Sequelize (an ORM for Node.js), Sequelize-CLI (command-line interface for Sequelize), sqlite3 (lightweight sqlite client for Nodejs apps), and nodemon for hot-server reloading.
Next, initialize Sequelize by running this command:
npx sequelize-cli init
This command will generate the following directories and files:
- config/config.json: Contains configuration for your database connections.
- models: Contains your models.
- migrations: Contains your migration files.
- seeders: Contains your seeder files.
Next, update the database configuration:
Open config/config.json and update it with these lines of code:
{
    "development": {
      "dialect": "sqlite",
      "storage": "../dev.sqlite"
    },
    "test": {
      "dialect": "sqlite",
      "storage": "../dev.test.sqlite"
    },
    "production": {
      "dialect": "sqlite",
      "storage": "../dev.prod.sqlite"
    }
  }
Then, create an Express server. Create an app.js file in the project root and add these lines of code:
const express = require("express");
const app = express();
const port = process.env.PORT || 3000;

app.get("/", (req, res) => {
  res.send("Hello World!");
});

app.listen(port, () => {
  console.log(`App listening at http://localhost:${port}`);
});
Go ahead and update package.json to look like this:
{
  "name": "sequelize-project",
  "version": "1.0.0",
  "description": "",
  "main": "index.js",
  "scripts": {
    "start": "nodemon app.js",
    "test": "echo \"Error: no test specified\" && exit 1"
  },
  "keywords": [],
  "author": "",
  "license": "ISC",
  "dependencies": {
    "express": "^4.18.2",
    "nodemon": "^2.0.21",
    "pg": "^8.10.0",
    "pg-hstore": "^2.3.4",
    "sequelize": "^6.29.3",
    "sequelize-cli": "^6.6.0"
  }
}
Run the development server with this command:
npm run start
It should be running on any available port or 3000:

Setting up the Database Connection
Let’s connect SQLite and Sequelize to our app server. Update app.js with these lines of code:
const express = require("express");
const { Sequelize } = require("sequelize");
const config = require("./config/config.json");
const router = require('./router/index');
const bodyParser = require("body-parser");
const app = express();
const port = process.env.PORT || 3000;
const env = process.env.NODE_ENV || "development";
const dbConfig = config[env];
const sequelize = new Sequelize(dbConfig);

app.use('/', router);
app.use(bodyParser.json());
app.use(bodyParser.urlencoded({ extended: true }));

async function testConnection() {
    try {
        await sequelize.authenticate();
        console.log("Connection to the database has been established successfully.");
    } catch (error) {
        console.error("Unable to connect to the database:", error);
    }
}

async function syncModels() {
    try {
        await sequelize.sync();
        console.log("Models have been synchronized with the database.");
    } catch (error) {
        console.error("Unable to sync models with the database:", error);
    }
}

syncModels();
testConnection();

app.listen(port, () => {
    console.log(`App listening at http://localhost:${port}`);
});
Run the server and you should see something like this:

Node app server running succesfully
Creating the Sequelize models
In this section, I'll be guiding you through the process of defining the schema for a Movie application and generating models using Sequelize-CLI. We'll be using Sequelize-cli to simplify the creation of our models and ensure that our associations are set up correctly. By the end of this section, you'll have a strong foundation in using Sequelize-cli to manage your database models. You'll be well on your way to building a robust and efficient application. Let's dive in!
Defining the database schema
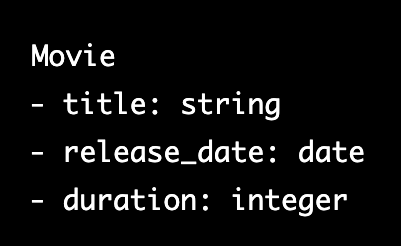
We'll create a database schema for the Movie app with the following entities: Movie. Here's the schema:
- Movie: Represents a movie with attributes such as
title,release date, andduration.
Creating the Sequelize models
We’ll use the sequelize-cli to generate the models.
Run this command on your terminal to create the Movie models:
npx sequelize-cli model:generate --name Movie --attributes title:string,releaseDate:date,duration:integer
This creates a movies.js file in models and a migration file for creating movies.
CRUD Operations using Sequelize Query Methods
In this section, we'll be implementing the critical CRUD (Create, Read, Update, Delete) logic for the Movie entity. We'll need to create a controller directory and movieController.js file to get started. I'll guide you through the process of adding these lines of code to the file:
const { Sequelize } = require('sequelize');

const sequelize = new Sequelize({
    dialect: 'sqlite',
    storage: '../dev.sqlite'
});

const Movie = require('../models/movie')(sequelize, Sequelize);

exports.createMovie = async (req, res) => {
    try {
        const movie = await Movie.create(req.body);
        res.status(201).json(movie);
    } catch (err) {
        res.status(400).json({ error: err.message });
    }
};

exports.getAllMovies = async (req, res) => {
    try {
        const movies = await Movie.findAll();
        res.json(movies);
    } catch (err) {
        res.status(500).json({ error: err.message });
    }
};

exports.getMovieById = async (req, res) => {
    const id = req.params.id;
    try {
        const movie = await Movie.findByPk(id);
        if (movie) {
            res.json(movie);
        } else {
            res.status(404).json({ error: 'Movie not found' });
        }
    } catch (err) {
        res.status(500).json({ error: err.message });
    }
};

exports.updateMovie = async (req, res) => {
    const id = req.params.id;
    try {
        const [rowsUpdated, [updatedMovie]] = await Movie.update(req.body, {
            where: { id },
            returning: true,
        });
        if (rowsUpdated === 0) {
            res.status(404).json({ error: 'Movie not found' });
        } else {
            res.json(updatedMovie);
        }
    } catch (err) {
        res.status(500).json({ error: err.message });
    }
};

exports.deleteMovie = async (req, res) => {
    const id = req.params.id;
    try {
        const rowsDeleted = await Movie.destroy({ where: { id } });
        if (rowsDeleted === 0) {
            res.status(404).json({ error: 'Movie not found' });
        } else {
            res.json({ message: 'Movie deleted successfully' });
        }
    } catch (err) {
        res.status(500).json({ error: err.message });
    }
};
Let’s breakdown this code snippet.
- First, it requires the
sequelizelibrary and creates asequelizeobject for interacting with the database. It also requires theMoviemodel using thesequelizeobject. - Then, it exports several functions that handle different HTTP requests:
createMoviefor creating a new movie,getAllMoviesfor getting all movies,getMovieByIdfor getting a single movie by its ID,updateMoviefor updating a movie by its ID, anddeleteMoviefor deleting a movie by its ID. - Each function is asynchronous, meaning it returns a Promise and waits for the database to return data before sending a response to the client.
- The
createMoviefunction creates a new movie by calling thecreatemethod on theMoviemodel and passing in the movie data from the request body. It then sends a201status code and the newly created movie object in the response. - The
getAllMoviesfunction retrieves all movies from the database by calling thefindAllmethod on theMoviemodel. It then sends a response with an array of movie objects. - The
getMovieByIdfunction retrieves a single movie from the database by its ID, passed in as a parameter in the request URL. It calls thefindByPkmethod on theMoviemodel, which finds a record by its primary key. If the movie is found, it sends a response with the movie object. It sends a404status code and an error message if it's not found. - The
updateMoviefunction updates a movie by its ID. It calls theupdatemethod on theMoviemodel and passes in the updated movie data from the request body, as well as an object that specifies the movie to update using theidparameter from the request URL. If the movie is successfully updated, it sends a response with the updated movie object. It sends a404status code and an error message if it's not found. - The
deleteMoviefunction deletes a movie by its ID. It calls thedestroymethod on theMoviemodel and passes in an object that specifies the movie to delete using theidparameter from the request URL. If the movie is successfully deleted, it sends a response with a success message. It sends a404status code and an error message if it's not found.
Seeding Database
Now that we've defined our Movie table, let's go ahead and seed some data into it to test our database. To do this, we'll need to create a seeder file. You can create a seeder file by running this command:
npx sequelize-cli seed:generate --name demo-data
This will create a demo-data.js seeder file in the seeders directory. Add these lines of code:
module.exports = {
  up: async (queryInterface, Sequelize) => {
    try {

      await queryInterface.bulkInsert('movies', [
        {
          title: 'The Matrix',
          releaseDate: '1999-03-31',
          duration: 3,
        },
        {
          title: 'Bridesmaids',
          releaseDate: '2011-04-28',
          duration: 5,
        },
        {
          title: 'The Social Network',
          releaseDate: '2010-09-24',
          duration: 4,
        },
        {
          title: 'The New Movie',
          releaseDate: '2015-09-24',
          duration: 4,
        }
      ]);

    } catch (error) {
      console.log(error)
    }
  },

  down: async (queryInterface, Sequelize) => {
    await queryInterface.bulkDelete('movies', null, {});
  }
};
Run the seeder with this command:
npx sequelize-cli db:seed:all
Output
Open the dev.sqlite with a sqlite explorer and you should have something like this.
;
const sequelize = new MockSequelize();
This will create a new instance of the MockSequelize class, which can be used to define mock models and instances.
Mocking model instances
When testing our Sequelize-based application, we often mock model instances to simulate interactions with our database. To accomplish this, we can use the MockModel class provided by sequelize-mock.
The MockModel class allows us to create mock instances of our Sequelize models, which we can use in our tests instead of connecting to a live database. This makes our tests more reliable, as we can control the data that our tests interact with and ensure that our tests are not affected by external factors.
Using sequelize-mock and the MockModel class is a straightforward process. We can create a new instance of MockModel and pass in the properties that we want to use for our mock model. For example, to create a new mock model for our Movie model, we can use the following code
const { MockModel } = require('sequelize-mock');

const MovieMock = new MockModel({
  title: 'Avengers',
  duration: 4,
});

const movie = MovieMock.build();
console.log(movie.toJSON());
This will create a mock User model with two fields, username and email. We then create a new user model instance using the build method and log its JSON representation to the console.
It's also possible to mock query results using MockQueryInterface. Here is an example:
const { MockQueryInterface } = require('sequelize-mock');

const queryInterface = new MockQueryInterface();
queryInterface.$queueResult([{ id: 1, title: 'Avengers' }]);
const movie = await queryInterface.select('Movies');
console.log(movie);
This will create a new instance of the MockQueryInterface class, and add a query result to its queue. We then execute a select query for the Movies table using the select method, and log the result to the console.
If we were to mock the movie model, this is what it would look like:
const { MockModel } = require('sequelize-mock');

const MovieMock = new MockModel();

MovieMock.init({
  title: 'The Matrix',
  releaseDate: new Date('1999-03-31'),
  duration: 136,
}, {
  sequelize: null,
  modelName: 'Movie',
});

console.log(MovieMock.toJSON());
Output:

Let’s go ahead and write test cases for the CRUD operation in our movie app and integrate Sequelize-mock into the test cases.
Writing test cases for Sequelize models
Choosing a testing framework is an essential step in the testing process, and i prefer Jest! Jest is a widely used testing framework that provides a simple and easy-to-use interface for writing and executing tests. It's also highly configurable, which makes it a popular choice for developers who need more advanced testing features.
Some of the benefits of using Jest for testing your Node.js applications include:
- Easy setup and configuration
- Simple and intuitive syntax for writing tests
- Built-in support for asynchronous testing
- Code coverage reporting
- Snapshot testing
- Powerful mocking capabilities
Overall, Jest is an excellent choice for testing Node.js applications, and it's great that you've found it to be a reliable and effective testing framework.
Run this command to install jest:
npm install jest
In your package.json file, add the following line under the "scripts" section:
"test": "jest"
This will allow you to run your tests using the npm test command.
Next, create a jest.config.js file in the root directory of your project and add these lines of code:
module.exports = {
  testEnvironment: 'node',
  testMatch: ['**/__tests__/**/*.test.js'],
  coveragePathIgnorePatterns: ['node_modules'],
  collectCoverage: true,
};
I specify that Jest should look for test files with the .test.js extension in the __tests__ folder, ignore the node_modules folder when generating code coverage reports, and collect code coverage information.
Next, create a __tests__ folder in the root directory of your project. This is where Jest will look for the test files by default.
Install supertest by running npm i supertest. Supertest is a package for testing HTTP requests. It provides an easy-to-use API for sending HTTP requests to an Express and inspects the responses.
Writing test cases for basic CRUD operations
Writing unit tests for the movie controller is essential to ensuring that our application is working as expected.
In your __test__ folder, create a movie.test.js and add these lines of code:
const { Sequelize } = require("sequelize");
const request = require("supertest");

const sequelize = new Sequelize({
  dialect: "sqlite",
  storage: ":memory:",
});

const baseURL = "http://localhost:3000";

const Movie = require("../models/movie")(sequelize, Sequelize);

beforeAll(async () => {
  await sequelize.sync({ force: true });
});

beforeEach(async () => {
  req = request(baseURL);
});

describe("movie controller", () => {
  describe("createMovie", () => {
    it("should create a new movie", async () => {
      const movie = {
        title: "The Matrix",
        releaseDate: "1999-03-31",
        duration: 136,
      };
      const response = await req.post("/movies").send(movie);
      expect(response.status).toBe(201);
      expect(response.body.title).toBe(movie.title);
      expect(response.body.releaseDate).toBe(movie.releaseDate);
      expect(response.body.duration).toBe(movie.duration);
    });

    it("should return 400 if request body is invalid", async () => {
      const movie = { title: "The Matrix", duration: 136 };
      const response = await req.post("/movies").send(movie);
      expect(response.status).toBe(400);
      expect(response.body.error).toBeDefined();
    });
  });

  describe("getAllMovies", () => {
    it("should return all movies", async () => {
      const movies = [
        { title: "The Matrix", releaseDate: "1999-03-31", duration: 136 },
        { title: "Inception", releaseDate: "2010-07-16", duration: 148 },
      ];
      await Movie.bulkCreate(movies);
      const response = await req.get("/movies");
      expect(response.status).toBe(200);
      expect(response.body.length).toBe(movies.length);
      expect(response.body[0].title).toBe(movies[0].title);
      expect(response.body[1].title).toBe(movies[1].title);
    });
  });
});
In the createMovie test, we send a POST request to the /movies endpoint with a valid movie object in the request body. We then check that the response status code is 201 (created) and that the response body contains the correct movie fields.
We also add another test case to check that the controller returns a 400 status code if the request body is invalid.
In the getAllMovies test, we first create some movie objects in the database using the bulkCreate method. We then send a GET request to the /movies endpoint and check that the response status code is 200 (OK) and that the response body contains all the movies that we created.
Output:
Run npm test --watchAll
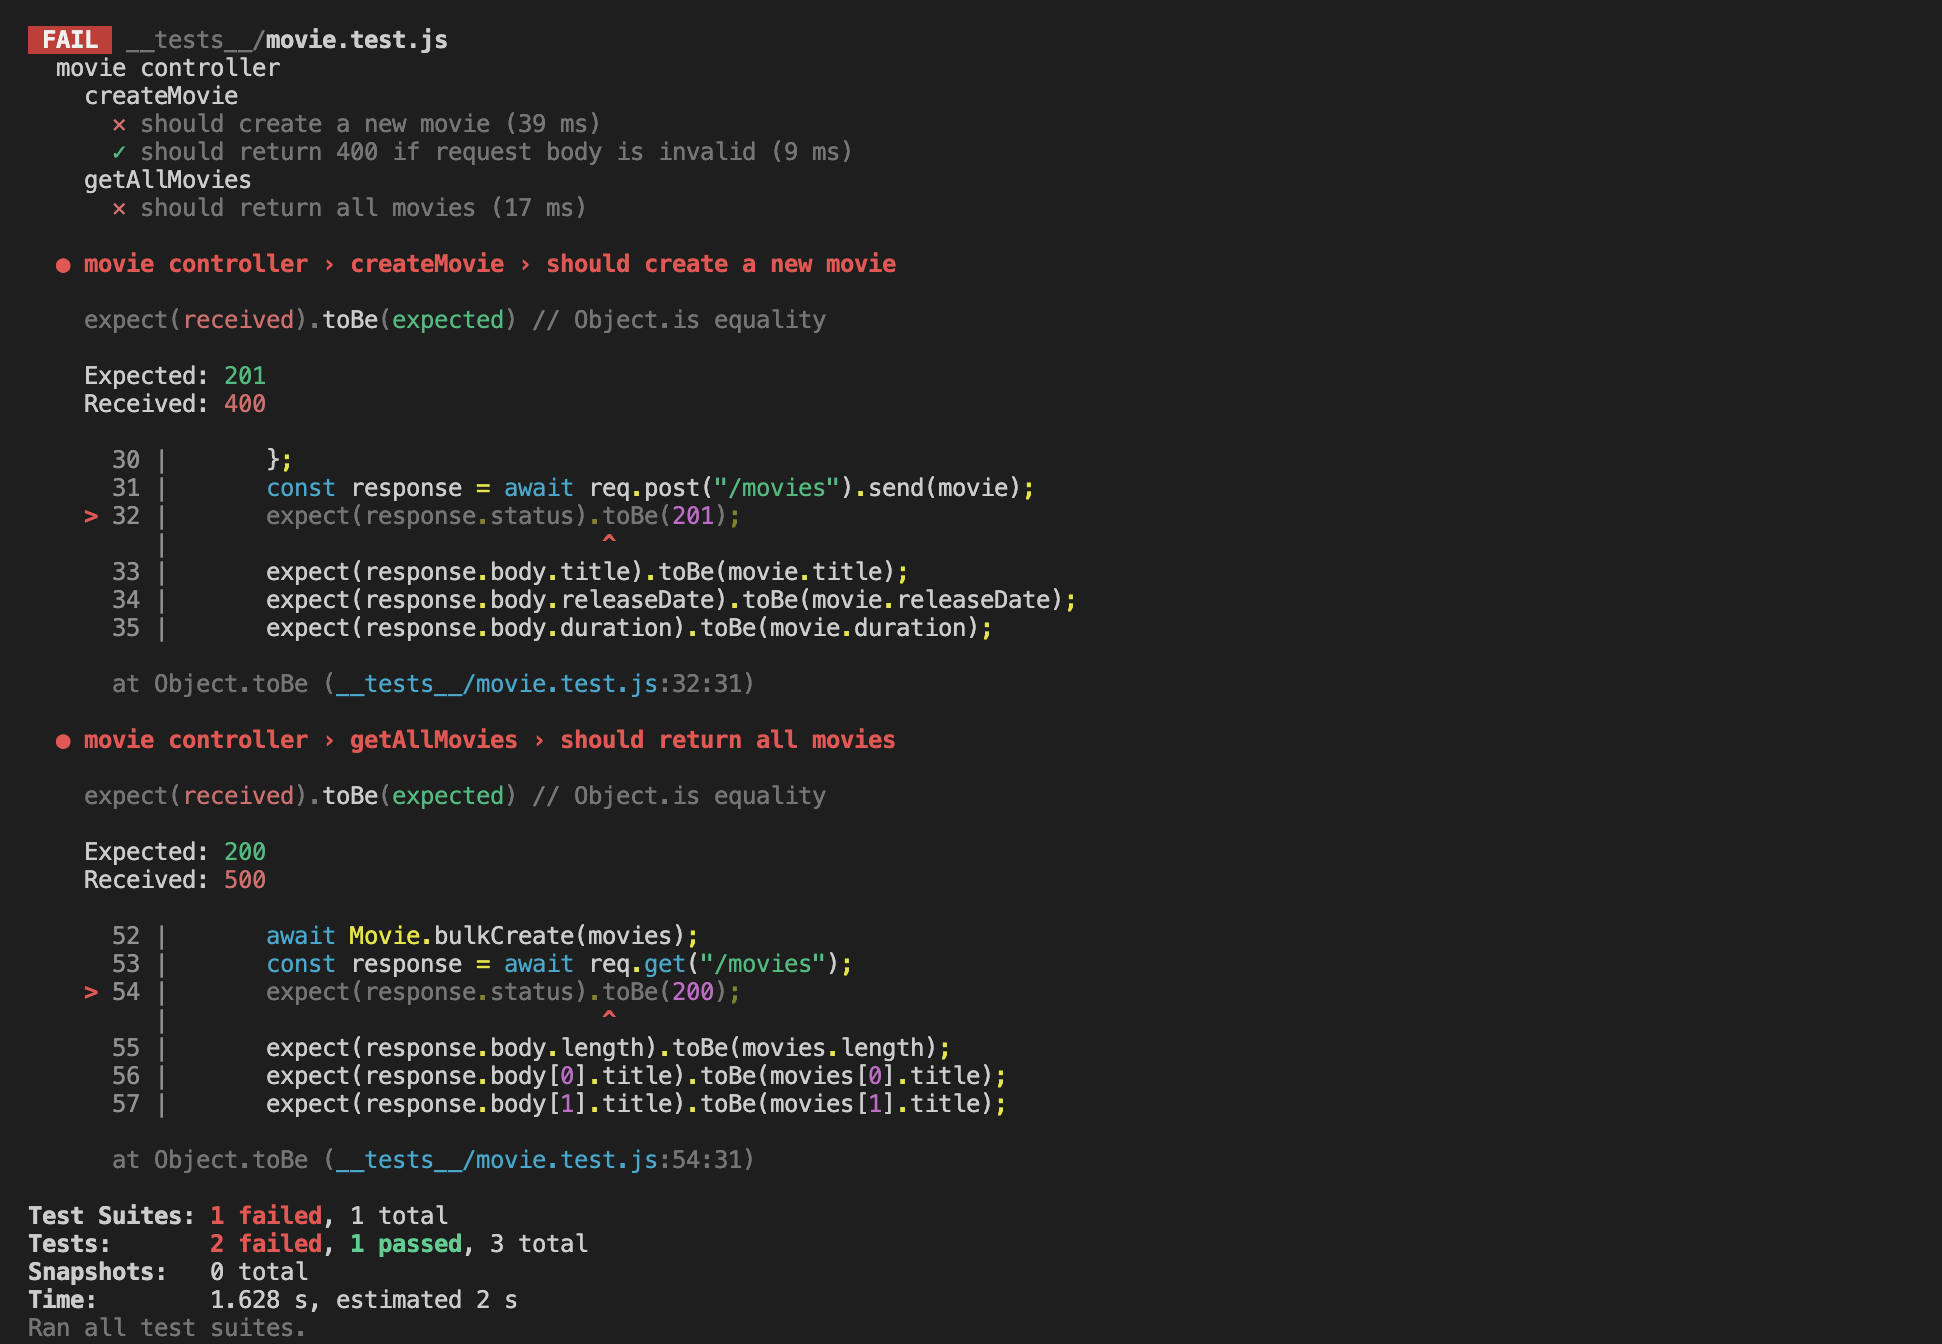
failed test cases with Jest
Ouch! 2 failed cases! I had some issues with the database setup, the Movie table was missing. After fixing it, this is the output.
Integrating Sequelize mock into test cases
As a developer, it's important to keep in mind the potential costs of using a live database in our test suite. In the last test, we used the Movie model from the live database, which can be slow and inefficient, especially as our application grows and our test suite becomes more complex.
We can use libraries like sequelize-mock to create mock instances of our models and simulate interactions with our database in our tests to address this issue. By doing so, we can ensure that our tests are reliable, efficient, and not affected by external factors.
Using sequelize-mock and similar libraries in our test suite is a great way to improve the quality and reliability of our code, and can save us a lot of time and effort in the long run. As developers, it's important to stay up-to-date with the latest testing tools and techniques and use them to build more robust and efficient applications.
Let’s integrate sequelize-mock into the test cases. Replace movie.test.js with these lines of code:
const SequelizeMock = require("sequelize-mock");
const { createMovie, getAllMovies } = require("../controllers/movieController");

describe("movie controller", () => {
  let sequelizeMock;
  let Movie;

  beforeAll(() => {
    sequelizeMock = new SequelizeMock();
    Movie = sequelizeMock.define("Movie", {
      title: "The Matrix",
      releaseDate: "1999-03-31",
      duration: 136,
    });
  });

  describe("createMovie", () => {
    it("should create a new movie", async () => {
      const movie = {
        title: "The Matrix",
        releaseDate: "1999-03-31",
        duration: 136,
      };
      Movie.$queueResult(Movie.build(movie));
      const response = await createMovie({ body: movie });
      expect(response.status).toBe(201);
      expect(response.body.title).toBe(movie.title);
      expect(response.body.releaseDate).toBe(movie.releaseDate);
      expect(response.body.duration).toBe(movie.duration);
    });

    it("should return 400 if request body is invalid", async () => {
      const movie = { title: "The Matrix", duration: 136 };
      const response = await createMovie({ body: movie });
      expect(response.status).toBe(400);
      expect(response.body.error).toBeDefined();
    });
  });

  describe("getAllMovies", () => {
    it("should return all movies", async () => {
      const movies = [
        { title: "The Matrix", releaseDate: "1999-03-31", duration: 136 },
        { title: "Inception", releaseDate: "2010-07-16", duration: 148 },
      ];
      Movie.$queueResult(movies.map((movie) => Movie.build(movie)));
      const response = await getAllMovies();
      expect(response.status).toBe(200);
      expect(response.body.length).toBe(movies.length);
      expect(response.body[0].title).toBe(movies[0].title);
      expect(response.body[1].title).toBe(movies[1].title);
    });
  });
});
First, we import Sequelize Mock and create a new mock Sequelize instance. We then define a mock Movie model using the define method and pass it to the createMovie and getAllMovies functions in place of the real Movie model.
In the createMovie test, we use the Movie.$queueResult method to queue up a new movie instance to be returned by the mock Movie model. We then call the createMovie function with a movie object in the request body and check the response status code and body.
In the getAllMovies test, we use the Movie.$queueResult method again to queue up an array of movie instances to be returned by the mock Movie model. We then call the getAllMovies function and check the response status code and body.
Best practices for mocking Sequelize databases
As a developer who has worked with Sequelize and sequelize-mock, it's great to see how much easier these tools make it to build and test Node.js applications.
That being said, it's important to keep in mind some best practices when working with sequelize-mock or any other mocking library.
- Keeping mock data separate from production data It's important to keep your mock data separate from your production data. This is especially important when working with sensitive data such as user information or financial data. You should create separate mock data for testing purposes and ensure it is never mixed up with real production data. One way to do this is to use a separate database instance or even a separate database service for your mock data.
- Updating mock data as the schema evolves As your Sequelize schema evolves, you need to make sure that your mock data is updated to reflect the changes. This is important to ensure that your tests remain accurate and relevant. One way to do this is to use a script to generate mock data based on your schema so that you can easily update the mock data whenever the schema changes.
- Ensuring test coverage for all relevant database operations When mocking your Sequelize database, ensuring you have test coverage for all relevant database operations is important. This includes operations such as creating, reading, updating, and deleting records. You should also test edge cases such as null values, empty strings, and invalid inputs to ensure that your application behaves as expected in these scenarios. One way to ensure test coverage is to use a code coverage tool such as Istanbul to measure the effectiveness of your tests. This will give you a better idea of which parts of your application are not being tested and help you to identify any gaps in your test coverage.
Wrapping up
In conclusion, mocking a Sequelize database can provide several benefits when testing applications that use Sequelize. By mocking the database, you can speed up test execution, create an isolated testing environment, have better control over test data, avoid external dependencies, and have greater flexibility in testing. These benefits can help you to catch errors or bugs before they make it into production and ultimately make your application more reliable.
Additional Resources
- The Sequelize Mock documentation
- The Jest documentation provides more information on how to use Jest to test Sequelize applications.
- The Sequelize documentation
Further Reading
- Testing Node.js Applications book by Jesse Rosenberger provides more information on best practices for testing Node.js applications, including testing with Sequelize.
- Clean Code: A Handbook of Agile Software Craftsmanship by Robert C. Martin provides more information on best practices for writing clean, maintainable, and testable code.